SharePoint 2010 contains the capability to route
documents to folders and libraries. SharePoint can even route documents
between site collections, as long as the Content Organizer is configured
in source and destination. The Content Organizer is the function that
manages these documents.
Folders within libraries are part of this feature,
which gives added flexibility to users who are comfortable with this
type of organization. Routing is very useful when managing limits within
document libraries, routing items such as proposals and RFPs, and using
managed metadata to determine where documents should reside.
Routing is determined via predefined rules. In this
recipe, we will configure the Content Organizer, set up a rule, and
route a document.&;&;
Getting ready
You must have a site set up and should be the owner of that site.
How to do it...
Open up the SharePoint website.
Click Site Actions, then Site Settings.
Under the Site Actions section, click Manage site features.
The first feature listed is the Content Organizer. Click on the Activate button to the right of the feature.
Click Site Settings. Two new menu items have been added to the Site Administration section. Refer to the next screenshot:

Click Content Organizer Rules.
Click the Add new item link.
The following pop-up screen appears:
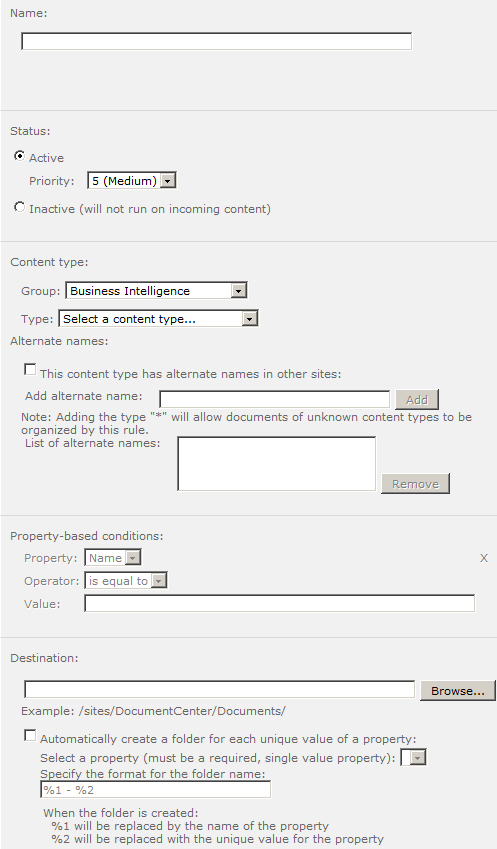
Fill in the fields as follows:
Name: Enter CashFlow in the textbox.
Status: Leave this as the default value, that is, Active.
Content type Group: Select Document Content Types from the drop-down list.
Content Type: Select Document from the drop-down list.
Property: Select Managed Keywords from the drop-down list.
Operator: is equal to (which is selected by default).
Value: Enter EBITDA in the textbox.
Destination: Click Browse and navigate to Shared Documents.
Click OK.
Click Drop Off Library and then Add new document.
Click the Browse button. Choose a document to upload and click OK.
Fill in the form as follows:&;&;
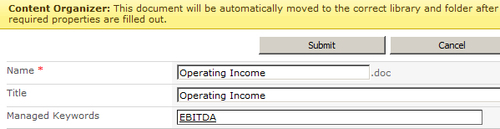
Click Submit. A message appears notifying you of the document's final location.
How it works...
Routing is configured at the site level and not at
the site collection level. Activating the feature not only creates the
two menu items as outlined in step 5, but also creates a document
library called Drop Off Library. All uploads are sent to this library.
This is a document library that has the standard features such as
workflow, approvals, check in/check out, alerts, and permissions.
Rules are based on content type and can contain
multiple conditions. In the example, we based the rule on Managed
Metadata (EBITDA).&;
If the uploaded document did not meet the rule's
condition, then the document would remain in the Drop Off Library.
E-mails would be generated to the rule managers (if the box to send
e-mails was checked).
By default, the Drop Off Library option&; manages
content types. The result of this is that when a rule is created for a
content type that is not native to the Drop Off Library, it will be
added dynamically.
There's more...
The second menu item added under Site Settings is Content Organizer Settings. This is where the configuration settings for the Content Organizer are found. The following are the options:
Redirect Users to the Drop Off Library:
Checking this box redirects users to the Drop Off Library when they try
and upload content in the site. This means that no matter what library
you try and upload content to, you will be redirected to the Drop Off
Library pop-up window shown in step 11. After entering the metadata and
submitting the document, it is routed as per the routing rules.
If this box is not enabled, only uploading to the Drop Off Library will enable a document to be routed as per the rules.
Sending to Another Site: When
checking this box, a document can be routed, as per the rules, to
another site that has the Content Organizer feature activated. It
provides a drop-down list of the targeted destinations. This is covered
in the next recipe.
Folder Partitioning: When checking
this box, a subfolder is dynamically created after the maximum number of
items (specified in the option) in the store is reached. The new item
is routed to the new folder and the name of the folder is controlled by
the second parameter. %1, the default
setting, is substituted with the date/time stamp. The number of items
and folder names is controlled by the owner of the site.
Duplicate Submissions: When a
document has the same name as a document already in the destination
library, we need to choose one of the two options. If versioning is
turned on, a new version of the document is added. The other option
appends unique characters to the end of the file.
Preserving Context: The original audit logs and properties for a document are kept with it after it is routed.
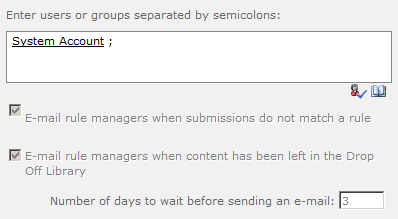
Rule Managers: This is a management
configuration. Owners are not the only people who can create rules and
manage the Drop Off Library. There are two checkbox options, where both
the rules are related to receiving e-mails. Enabling the first checkbox
will cause the rule managers to receive an e-mail when an item does not
match a rule. The second check box has the effect of sending e-mails to
the rule managers when items are left in the Drop Off Library.
Submission Points: A URL to the web service is presented. This option is useful when setting up other sites and workflows for routing.